


Battle of the Hook 1952–53: Black Watch, Duke of Wellington's Regiment & the Last Korean War Battles — Complete Field Guide
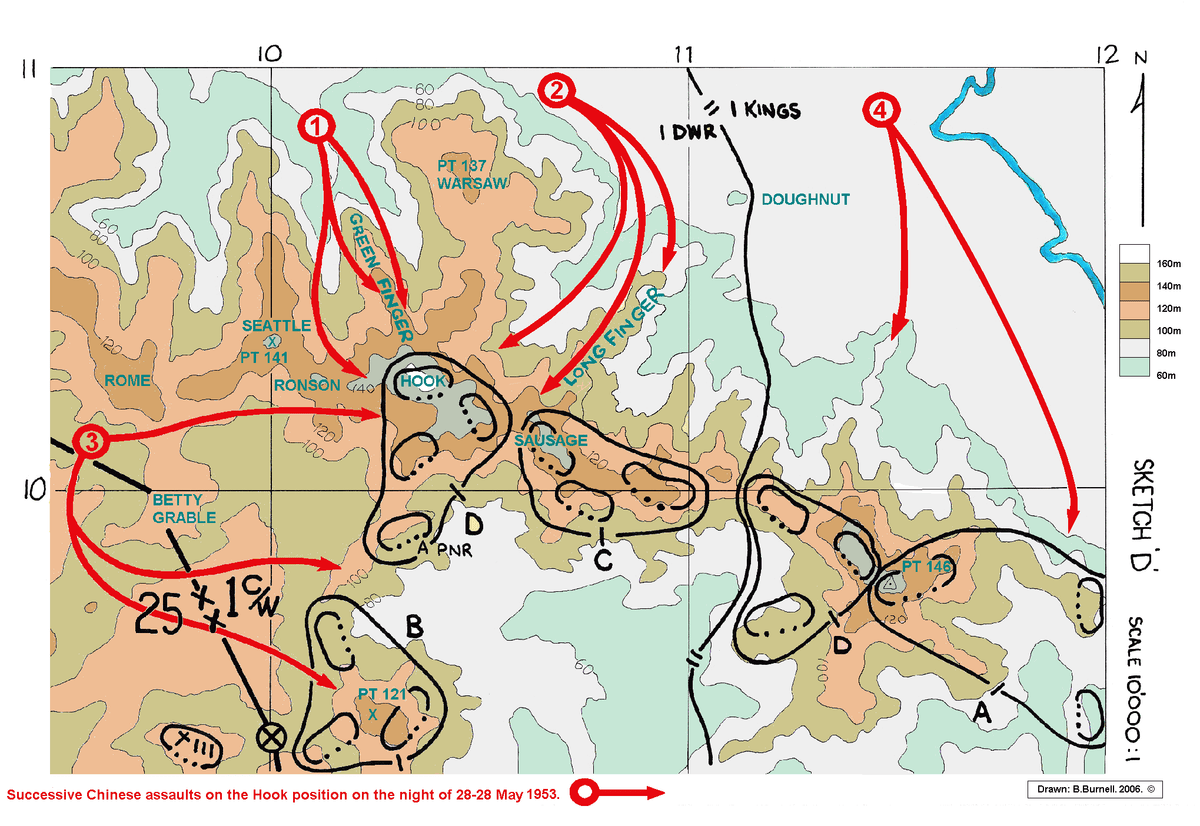
The Hook was not one battle. It was a ridge fought over repeatedly because its shape and position dominated approaches to the United Nations line west of the Imjin.
By late 1951 the Korean War had changed character. The rapid advances and retreats of the first year gave way to fortified lines, patrols, artillery duels and limited attacks fought while armistice negotiations continued at Panmunjom. The Hook became one of the places where that static war was anything but quiet.
This Field Note follows the Hook from the Commonwealth Division's arrival on the line through the major Chinese attacks of November 1952 and May 1953. For the wider campaign, see the Korean War campaign guide. For the earlier crisis that shaped British memory of Korea, see Imjin River.
Why the Hook mattered
The Hook was a curved ridge system overlooking routes and valleys leading toward the UN rear. Its forward slopes provided observation, but the feature also invited attack because losing it could expose neighbouring positions. By 1952 both sides knew the ground well. Trenches, bunkers, wire, minefields, artillery defensive-fire plans and rehearsed counter-attack routes turned the ridge into a prepared battlefield.
From manoeuvre to positional war
After Operation Commando in October 1951, the 1st Commonwealth Division occupied a sector that included the Hook area. The front then hardened. Patrols crossed no-man's-land at night; artillery and mortars searched likely routes; engineers repaired wire and trenches; infantry rotated between exposed forward positions and rear rest areas.
That routine could be deceptive. A battalion might spend days improving positions and then face a massed night assault with almost no warning beyond the opening bombardment.
The Black Watch, November 1952
In November 1952, 1st Battalion The Black Watch defended the Hook against a determined Chinese attack. The assault followed heavy artillery and mortar fire. Chinese infantry pushed into forward positions and fighting became close-range.
The defenders relied on more than rifles and machine guns. Artillery defensive-fire tasks, mortars, tanks and engineers were integral to the position. Communications were repeatedly damaged and restored. Ammunition had to move forward through shelling while casualties moved the other way.
The Black Watch held the feature. The result mattered because it confirmed that the Hook could be defended—but only with depth, artillery and rapid reinforcement.
Explore this history
Continue from this Field Note into the closest Gallus campaign and military-history collection.
The Duke of Wellington's Regiment, May 1953
By May 1953 the 1st Battalion Duke of Wellington's Regiment held the Hook. On 28–29 May, Chinese forces attacked again in strength. The battalion's front companies absorbed the first blows while British and Commonwealth artillery fired enormous quantities of ammunition onto approach routes and captured trenches.
Fighting moved backwards and forwards across sections of the position. Local counter-attacks restored lost ground. Tanks fired in support where terrain allowed. Engineers and signallers worked under fire to keep the defensive system functioning.
The battle was fought only weeks before the armistice. That timing gives it a particular harshness: soldiers were dying over ground while diplomats were already negotiating the terms of a ceasefire.
Artillery and the geometry of defence
The Hook demonstrates why a prepared defensive position is a system rather than a trench. Forward companies were only the visible edge. Behind them sat artillery batteries, command posts, ammunition points, casualty evacuation routes, reserve companies and communications networks.
Pre-planned defensive fire allowed guns to hit likely assault lanes quickly. But fire plans were not automatic victory. Observers had to survive, communications had to work and ammunition stocks had to keep arriving. The Hook was as much a logistics and signals battle as an infantry one.
Life between attacks
Photographs of British soldiers at the Hook often show men smoking, eating or waiting in trenches. That should not be mistaken for inactivity. Static warfare creates a rhythm of labour: repair wire, deepen shelters, register weapons, carry ammunition, patrol, stand-to, sleep when possible and then repeat.
Cold, mud, heat, insects and the constant knowledge that enemy patrols were close shaped the experience. Korea could look quiet in daylight and become extremely dangerous after dark.
Casualties and evidence
Casualty totals differ between accounts because some sources count only battalion losses in the principal assault, while others include attached arms and the broader sector. The safest approach is to treat figures by unit and date rather than blending them into one dramatic total.
What is not disputed is that the repeated battles for the Hook were costly to both sides and that Chinese forces accepted heavy losses in attempts to seize the feature.
Myths and evidence
“The Hook was one battle.”
No. Major actions occurred at different times, involving different Commonwealth units.
“Static warfare meant little happened.”
No. Patrols, raids, artillery duels and major night assaults made the supposedly static front intensely active.
“Infantry held the Hook by themselves.”
No. Artillery, armour, engineers, signals and logistics were central to the defence.
“The May 1953 battle had no purpose because peace was close.”
The military value of ground and negotiating leverage remained real until the ceasefire took effect, even if hindsight makes the losses feel especially bitter.
The Hook today
The battlefield lies close to the later Demilitarized Zone. Access and exact viewing points can be restricted, so modern battlefield study often depends on period maps, veterans' sketches and memorial material. The surviving shape of the ridges still explains why the position mattered.
Continue exploring
Sources and evidence used
- National Army Museum — Korean War, for the Commonwealth Division and the Hook battles.
- War diaries of 1st Black Watch and 1st Duke of Wellington's Regiment, plus supporting artillery records.
- Commonwealth divisional histories and Korean War official histories for the 1952–53 positional phase.
Related Field Notes
CONTINUE THE STORY
More from this campaign
Read it, reference it or wear it — the related pieces are kept together here.
FEATURED DESIGN

Imjin River 1951 T-Shirt — Korean War Heritage
€29,95 EUR
View the design →FIELD NOTES
Get new Field Notes by email
New research, campaign guides and useful references without a daily sales barrage.
