


Battle of Kapyong 1951: Complete Field Guide — Hill 504, Hill 677 & the Commonwealth Defence
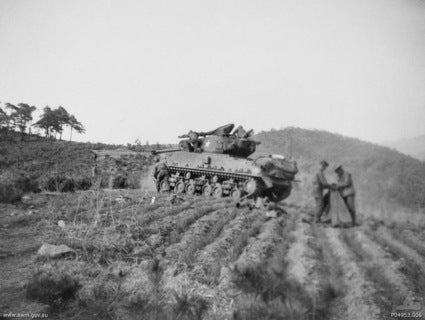
Kapyong, 22–25 April 1951. The Battle of Kapyong was fought at the same time as the Battle of the Imjin River, during the opening of the Chinese Spring Offensive. Yet it developed very differently. At Imjin, 29th British Brigade suffered devastating losses and the Glosters were effectively destroyed as a fighting battalion. At Kapyong, a hastily deployed Commonwealth force held a key valley with far lighter losses.
That contrast is why Kapyong matters beyond Australian or Canadian national memory. The battle is a case study in ground, artillery, armour, all-round defence and the timing of withdrawal. It also shows why simple stories about "better" soldiers are not enough. The Australians, Canadians, New Zealanders, British troops and American tank crews were all operating inside a confused battle in which the tactical picture changed by the hour.
At a glance
- Dates: 22–25 April 1951; the main Commonwealth fighting took place from 23 to 25 April.
- War: Korean War.
- Formation: 27th British Commonwealth Infantry Brigade.
- Brigade commander: Brigadier Brian Burke.
- Main infantry: 3rd Battalion, Royal Australian Regiment (3 RAR); 2nd Battalion, Princess Patricia's Canadian Light Infantry (2 PPCLI); 1st Battalion, Middlesex Regiment operating forward with the artillery during the opening phase.
- Artillery: 16th Field Regiment, Royal New Zealand Artillery, later reinforced by US artillery.
- Armour: Sherman tanks of A Company, US 72nd Heavy Tank Battalion.
- Key ground: Hill 504 east of the valley, Hill 677 west of it and Sudok-san / Hill 794 farther north.
- Enemy: Chinese People's Volunteer Army forces advancing after the collapse of the 6th Republic of Korea Division.


The wider offensive
The Chinese Spring Offensive began on 22 April 1951 across a broad front. Kapyong was not an isolated battle. To the west, 29th British Brigade was already fighting on the Imjin River. Farther east, South Korean formations were also under severe pressure.
The 6th Republic of Korea Division broke under the Chinese attack and streamed south through the Kapyong Valley. That collapse created the immediate problem for 27th Commonwealth Brigade: the valley could become an open route south unless fresh troops blocked it.
Read the Korean War 1950–1953 campaign guide →
The ground
Kapyong was a valley battle dominated by hills. Brigadier Burke initially considered three key features: Hill 794 to the north, Hill 677 on the western side and Hill 504 on the east. In theory, three battalions occupying those features could dominate the road and river running through the valley.
In practice, Burke did not have all three battalions available. The Middlesex had been sent forward with 16th Field Regiment to support the retreating South Koreans and protect the New Zealand guns. That left 3 RAR and 2 PPCLI to occupy the main blocking positions at short notice.
The frontage was too wide for a continuous line. The solution was a series of strongpoints on high ground. That meant accepting gaps — and accepting that Chinese troops might move between and behind them.
Order of battle
| Unit | Role |
|---|---|
| 27th British Commonwealth Infantry Brigade | Brigade commanded by Brigadier Brian Burke. |
| 3rd Battalion, Royal Australian Regiment | Held Hill 504 and associated spurs on the eastern side of the valley. |
| 2nd Battalion, Princess Patricia's Canadian Light Infantry | Held Hill 677 on the western side. |
| 1st Battalion, Middlesex Regiment | Initially moved forward with New Zealand artillery and helped cover the wider brigade sector. |
| 16th Field Regiment, Royal New Zealand Artillery | 25-pounder support that became decisive during both the Australian and Canadian phases. |
| A Company, 72nd Heavy Tank Battalion, US Army | Sherman tank support in and around the valley. |
Key personalities
Brigadier Brian Burke
Burke had to build a defensive plan while information from the collapsing South Korean front was incomplete. His original three-hill concept had to be adapted when the Middlesex was committed forward with the gunners. The battle that followed was therefore not the execution of a settled defensive scheme. It was a plan being revised while the enemy was already approaching.
Lieutenant-Colonel Bruce Ferguson — 3 RAR

Ferguson commanded the Australians on Hill 504. His companies were spread across the feature and nearby ground while battalion headquarters sat lower in the valley. Communications became a serious problem once fighting started and Chinese troops infiltrated among the withdrawing South Koreans.
Lieutenant-Colonel James "Jim" Stone — 2 PPCLI
Stone commanded the Canadians on Hill 677. His battalion's defensive organisation, artillery integration and ability to hold an all-round position became central to the second phase of the battle.
23 April: from reconnaissance to battle
Early on 23 April, the Commonwealth brigade was still treating occupation of the hills as a contingency. Reconnaissance parties moved toward Hill 504 and Hill 677 while reports suggested the active front remained several miles farther north.
That assumption collapsed as South Korean soldiers and civilians began moving south in increasing numbers. By mid-afternoon the order changed from reconnaissance to occupation.
The Australians moved onto Hill 504. The Canadians occupied Hill 677. Neither battalion had the luxury of building a deep defensive system over days. Positions were selected, weapons sited and communications established while the front was already disintegrating ahead of them.
3 RAR on Hill 504
The Australian companies were spread across Hill 504 and its approaches. D Company held the summit. A Company occupied the north-western spur. B Company held lower ground near the valley and river, where American Sherman tanks could provide direct fire. C Company occupied rearward ground.
The terrain gave observation and fields of fire, but it also broke communications. Radio performance and severed telephone lines meant company commanders and battalion headquarters did not always share the same picture.
The first night: close-range fighting
Chinese troops followed the retreating South Koreans down the valley. During the night of 23/24 April, attacks developed against A and B Companies.
For A Company the opening hours were particularly difficult because artillery support was not immediately available. The New Zealand guns had moved after dark and had not yet been fully surveyed into their new positions. Terrain also interfered with radio communications. The result was exactly the situation infantry least wanted: Chinese attacks closing to grenade and small-arms range before supporting fire could be brought down effectively.
MacKenzie's account is valuable because it does not smooth this into a perfect defence. Australian positions were penetrated. Platoons were reduced. Battalion headquarters itself was threatened in the valley. Some of the American tanks temporarily withdrew when Chinese troops appeared around them.
Yet the battalion did not collapse. Local counter-attacks, Vickers and Bren fire, mortars and the Sherman tanks helped restore threatened sectors.
The Sherman tanks
The American armour was more than background support. Sherman platoons operated on the valley floor and around Australian positions, evacuating wounded, engaging Chinese infantry and helping restore penetrated positions.
Tanks were also vulnerable. In darkness and broken ground, crews could lose the infantry picture rapidly. The battle repeatedly demonstrated that armour was most effective when integrated with infantry and artillery rather than treated as a separate arm.
Artillery becomes decisive
Once 16th Field Regiment was properly established, the New Zealand 25-pounders became one of the most important elements in the battle.
The Australians could call defensive fire onto approaches and later use artillery to cover their withdrawal. When 2 PPCLI became the main target, the same guns shifted their weight to Hill 677. American artillery also reinforced the fire plan.
This continuity mattered. The infantry battalion being attacked changed; the supporting fire system did not.
24 April: the Australian withdrawal
By daylight 3 RAR was still holding, but its position was becoming increasingly awkward. Chinese troops were moving through the valley and around the battalion. Headquarters had been threatened, communications were poor and the battalion risked becoming isolated from the rest of the brigade.
The decision was made to withdraw.
This was not a rout. Companies moved back in stages while artillery covered the disengagement. The operation was dangerous because some positions had to break contact while enemy troops were close. The New Zealand guns fired heavily to suppress likely Chinese approaches.
The battalion suffered significant casualties, but it came out as a coherent force.
That point matters when Kapyong is compared with Imjin. Withdrawal was not evidence that the Australians had failed to hold. It was the decision that prevented a local stand from becoming an encirclement with no escape route.
Hill 677: the Canadian phase
With 3 RAR withdrawn, Chinese pressure shifted toward 2 PPCLI on Hill 677.
Stone's battalion was organised for all-round defence. The hill itself was steep, forcing attackers to climb into prepared positions. The Canadians also had increasingly effective artillery support.
During the night of 24/25 April Chinese troops attacked repeatedly. Some penetrated Canadian positions. At the closest points, artillery was called down extremely near — and at times onto — the defended area to break up assaults.
The fighting was not a clean perimeter-versus-wave diagram. Men lost contact with neighbouring positions, sections were bypassed, and Chinese troops appeared inside parts of the defensive area. But the battalion maintained cohesion.
Danger close
Kapyong's most famous artillery episode is often reduced to the Canadians "calling fire on themselves." The reality was more controlled than the phrase suggests but no less serious.
Defensive fire tasks were brought extremely close to Canadian positions because Chinese troops had penetrated into and around the battalion area. New Zealand gunners fired thousands of rounds through the night, adjusting the fire as the situation changed.
It worked because the communications chain still existed. The Canadians were under extreme pressure, but they were not tactically disconnected from the brigade's supporting arms.
25 April: the line holds
By morning, the Chinese assault had lost momentum. 2 PPCLI remained on Hill 677. Supplies could be delivered by air and the brigade position stabilised.
The Chinese offensive continued elsewhere, but the route through Kapyong had not become the breakthrough corridor it might have been after the collapse of the South Korean division.

Casualties and honours
Australian and Canadian losses were serious, but much smaller than those suffered by 29 Brigade at the Imjin. Canadian official sources record 10 killed and 23 wounded in 2 PPCLI during the battle. Australian losses were heavier, reflecting the intense first-night fighting and the difficult withdrawal.
3 RAR and 2 PPCLI received United States Presidential Unit Citations. A Company of the US 72nd Heavy Tank Battalion was also recognised for its role, while 16th Field Regiment RNZA received a Republic of Korea Presidential Unit Citation.
Kapyong was a coalition battle
National histories naturally focus on their own battalions. Australians remember Hill 504. Canadians remember Hill 677. New Zealanders remember the gun line. Americans can point to the Sherman crews.
The battle only makes full sense when those stories are combined.
- 3 RAR absorbed and fought the first major attacks.
- The Australian withdrawal prevented the battalion being trapped.
- 2 PPCLI then became the main infantry blocking force.
- 16th Field Regiment supported both battalions.
- American tanks provided direct fire and mobility in the valley.
- British brigade command connected those parts into one defensive action.
Imjin and Kapyong: why the outcomes differed
S. P. MacKenzie built his study around this exact question. The two battles happened simultaneously. Both involved brigades facing a much larger Chinese offensive. Both had gaps between hill positions. Both suffered confusion. Yet the loss rates were radically different.
The answer is not that Kapyong troops were simply braver or better motivated. MacKenzie explicitly rejects that easy contrast. British reservists and National Servicemen at Imjin fought hard; Australian and Canadian volunteers also experienced fear, confusion and mistakes.
More useful differences include:
- Terrain: Hill 677 in particular offered steep approaches favourable to defence.
- Chinese preparation: the Imjin front had been more carefully reconnoitred before the offensive; at Kapyong Chinese forces were exploiting a rapidly developing collapse.
- Artillery integration: once established, Commonwealth defensive fire remained available through the critical phases at Kapyong.
- Withdrawal: 3 RAR was ordered out before its position became an inescapable pocket.
- Command relationships: the two brigades sat inside different US higher-command structures and received different information and direction.
Read the Imjin River 1951 Field Note →
Did Kapyong "save Seoul"?
Kapyong helped block an important route south and contributed to slowing the Chinese offensive. It bought time and prevented a local collapse from becoming a deeper penetration.
But the claim that one brigade or one battle single-handedly "saved Seoul" is too neat. The Chinese offensive was being fought across a much wider front, including at the Imjin and by other UN formations. The operational outcome came from the combined resistance and subsequent stabilisation of Eighth Army.
What Kapyong teaches
Kapyong is a useful battle because it shows how a force can be tactically improvised without becoming tactically incoherent.
The brigade had incomplete information. One battalion was committed elsewhere. The South Korean division ahead had collapsed. Positions had to be occupied quickly. Communications failed in places. Artillery initially could not respond to some requests.
And yet enough of the system survived: companies kept fighting, armour remained available, guns came into action, and commanders were willing to withdraw a battalion before it was destroyed.
That is less dramatic than a last stand. It is also one of the reasons Kapyong ended differently from the Imjin.
Wear the history
Kapyong 1951 Battle Scene T-Shirt →
Related Field Notes
- Korean War 1950–1953 — Complete British & Commonwealth Campaign Guide
- Battle of the Imjin River 1951 — Complete Field Guide
- General Douglas MacArthur — Pacific, Japan & Korea
Sources & further reading
- S. P. MacKenzie, The Imjin and Kapyong Battles, Korea, 1951 (Indiana University Press, 2013). Principal comparative source for the tactical narrative and Imjin/Kapyong analysis.
- Michael Patrick Cullinane and Iain Johnston-White (eds.), A Forgotten British War: The Accounts of Korean War Veterans (Palgrave Macmillan, 2023).
- Stephen F. Kelly, British Soldiers of the Korean War (The History Press, 2013).
- William Stueck, The Korean War: An International History (Princeton University Press, 1995).
- Australian War Memorial — Battle of Kapyong.
- Government of Canada — Kapyong battle honour.
- Veterans Affairs Canada — Battle of Kapyong.
CONTINUE THE STORY
More from this campaign
Read it, reference it or wear it — the related pieces are kept together here.
FEATURED DESIGN
Kapyong 1951 Battle Scene T-Shirt — Korean War
€29,95 EUR
View the design →FIELD NOTES
Get new Field Notes by email
New research, campaign guides and useful references without a daily sales barrage.
