


Operation Black Buck 1982: Complete Field Guide — Vulcan 607, Victor Tankers, Shrike & What the Raids Achieved
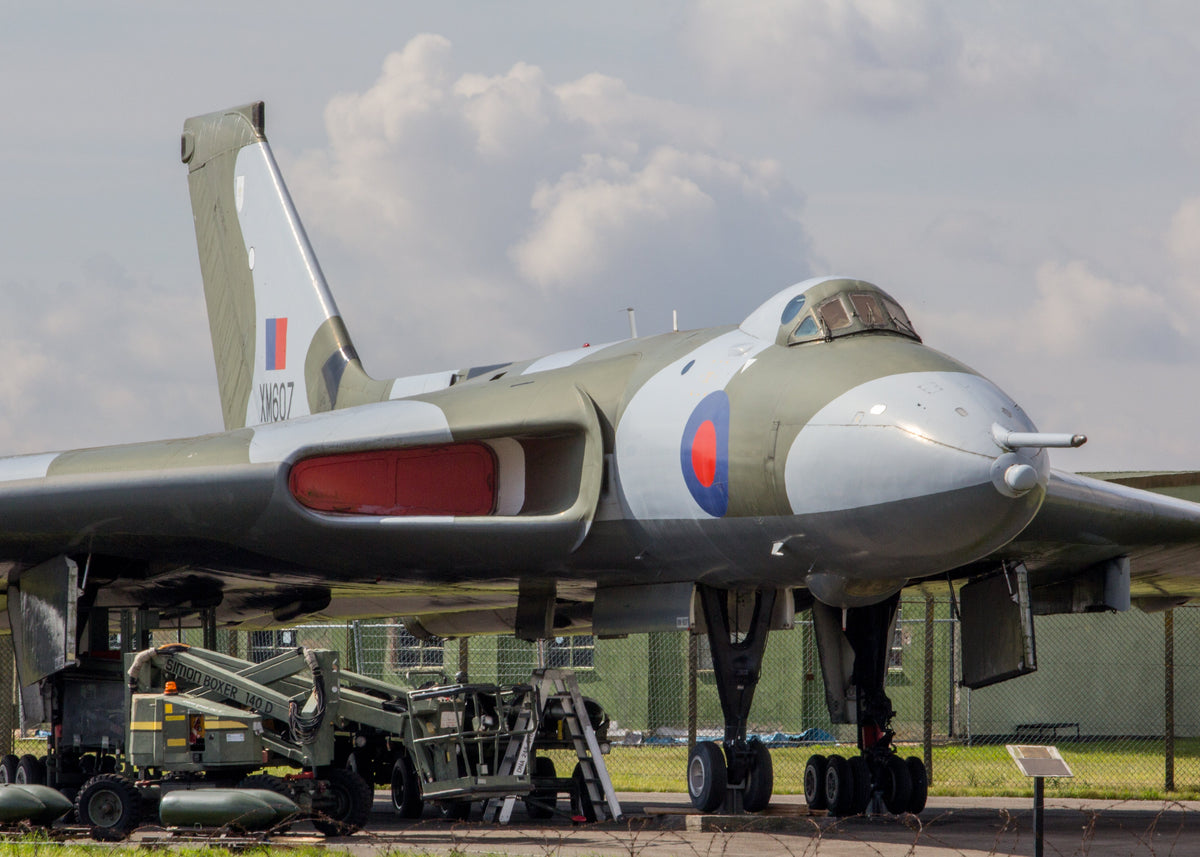
Operation Black Buck, April–June 1982. The RAF's Vulcan raids from Ascension Island to the Falklands were among the most audacious air operations of the war. They were also among the most argued-over. The flying achievement is beyond dispute: ageing bombers, crews hurriedly returned to conventional bombing and air-to-air refuelling, and a Victor tanker force operating at the edge of what had been thought practical combined to put weapons onto targets more than 3,000 nautical miles from their launch base.
The harder question is what that effort actually achieved. Black Buck 1 put one 1,000lb bomb across the Stanley runway. Later raids attacked the airfield again and then shifted to Argentine radar with American AGM-45 Shrike anti-radiation missiles. The runway remained usable by transports. Argentine fast jets did not operate from Stanley. Some Argentine Mirage III fighters were retained for mainland air defence. Radar crews became more cautious. None of those facts, by itself, settles the argument.
This Field Note separates three things that are often mixed together: the flying achievement, the tactical effects on the Falklands, and the wider strategic/psychological effect.

At a glance
- Operation: Black Buck.
- War: Falklands War / Operation Corporate.
- Launch base: Wideawake Airfield, Ascension Island.
- Strike aircraft: Avro Vulcan B.2.
- Tankers: Handley Page Victor K.2.
- Primary targets: Stanley airfield/runway and Argentine radar installations.
- Main weapons: 1,000lb conventional bombs and AGM-45 Shrike anti-radiation missiles.
- Completed named raids: Black Buck 1, 2, 5, 6 and 7. Black Buck 3 was cancelled; Black Buck 4 launched but was aborted/recalled.
- Most famous aircraft: Vulcan XM607, flown by Martin Withers on Black Buck 1 and Black Buck 7.
Why the RAF looked at the Vulcan
The Falklands crisis arrived at an awkward moment for the Vulcan force. The remaining squadrons were approaching disbandment. Their crews had trained primarily for the nuclear role, and conventional bombing had not been their daily business for years. Air-to-air refuelling had also fallen out of normal Vulcan practice.
Yet the RAF had a problem. The nearest usable British staging base was Ascension Island, roughly midway between Britain and the South Atlantic theatre. The Vulcan was the only RAF bomber with the combination of payload, navigation equipment and potential refuelled range to attack the islands from there.
Rowland White's account is especially valuable because it was built around extensive interviews with Vulcan and Victor aircrew, engineers and senior RAF officers. It shows that the operation was not the execution of a long-maintained contingency plan. It was a capability rebuilt at speed.
The forgotten foundation: air-to-air refuelling
Black Buck is usually remembered as a Vulcan story. Operationally, it was at least as much a Victor story.
The intellectual roots went further back still. RAF Valiants had pioneered long-range V-bomber refuelling in the 1950s and early 1960s. The techniques built in that era later allowed Victors to become Britain's strategic tanker fleet. Without that institutional knowledge there was no realistic path from Ascension to Stanley.
The Vulcan crews themselves had to relearn receiving fuel. The Victor force had to expand tanker-to-tanker proficiency rapidly because the only way to move enough fuel far enough south was to refuel the tankers that would then refuel the strike aircraft.
Ascension Island: the hinge of the campaign
Wideawake became one of the most important pieces of ground in the entire British campaign. Transport aircraft, Nimrods, Victors, Vulcans and supporting personnel crowded onto an airfield that had never been intended to function as the hub of a major South Atlantic war.
For Black Buck 1, the planning team worked largely with performance tables, paper, slide rules and a basic pocket calculator. The idea was conceptually simple but operationally brutal: send a large wave south, progressively transfer fuel from aircraft turning back to those continuing, and reduce the formation until one final Victor could give the Vulcan enough fuel to attack.
The Black Buck 1 refuelling plan
The planned outbound force consisted of eleven Victor K.2 tankers and two Vulcans, including reserves. White describes White, Red and Blue sections working through successive refuelling brackets. Fuel could pass through several aircraft before eventually being burned in the Vulcan's Olympus engines.
That matters because the headline distance hides the real difficulty. The Vulcan did not simply need enough fuel for a long trip. The RAF had to move fuel south using aircraft that themselves consumed huge quantities of fuel merely to carry it.
Some of the Victors returning from the first brackets landed at Ascension with only a few thousand pounds of fuel remaining. The plan was already operating with much less margin than its neat lines on paper suggested.
The target: Stanley airfield
British planners concluded that Stanley was the only Falklands airfield that could plausibly support significant Argentine air operations and logistical reinforcement. C-130 Hercules, Fokker transports and other aircraft were already using it. There was also concern—never completely supported by firm evidence—that runway extension could allow more capable fast jets to operate from the islands.
The bombing geometry was designed to maximise the chance of cutting the runway. Rather than fly directly along its length, the bomb stick would cross it at an angle so that a single line of 21 bombs had a reasonable probability of placing at least one crater on the paved surface.

Black Buck 1: 30 April–1 May
Squadron Leader John Reeve was initially the primary Vulcan captain in XM598, with Flight Lieutenant Martin Withers in XM607 as the airborne reserve. Soon after take-off, XM598 suffered a cockpit pressurisation problem and turned back. Withers and XM607 inherited the mission.
The tanker plan then suffered its own problems. One Victor developed a hose drum fault. Fuel consumption ran higher than expected. Crews had to make real-time corrections to a plan that had already been calculated close to limits.
The final southbound tanker was flown by Bob Tuxford. His Victor had to give away fuel it also needed for its own return. The nested tanker operation is the real engineering achievement of Black Buck 1: without it, XM607 never reached the target.

The bomb run
XM607 approached the Falklands at low level before climbing for the attack. The crew used electronic countermeasures to complicate Argentine radar tracking. Twenty-one 1,000lb bombs were released across the airfield.
One bomb cut the runway. Others crossed the airfield and surrounding ground. The strike caused blast damage and casualties around the airfield, but it did not close Stanley to transport aircraft.
British reconnaissance later showed the basic result clearly: the runway was cratered, but not destroyed. Sea Harrier attacks on the same day added further damage around the airfield.
What Black Buck 1 actually achieved
The safest conclusion is narrower than either extreme of the later argument.
- It did put a crater into Stanley's runway.
- It did not stop Argentine Hercules and other transport use of the airfield.
- It contributed to making runway extension and regular fast-jet operations from Stanley less attractive and more difficult.
- It demonstrated that the RAF could reach the islands from Ascension.
- It created a credible implication that, under different political orders, Vulcans might reach targets on the Argentine mainland.
- Argentine Mirage III aircraft were retained for mainland air defence, although the extent to which Black Buck alone caused that decision remains disputed.
Lawrence Freedman's official history treats the effect with appropriate caution. He notes that the runway crater mattered, that it probably helped preclude more capable Argentine aircraft from using Stanley, and that the psychological mainland threat influenced Argentine dispositions. But he also makes clear that the raids were expensive and cumbersome, and that other factors—including Argentine losses and tactical realities—also shaped decisions.
Black Buck 2: 3–4 May
The second bombing raid again targeted Stanley. Attack altitude was increased because of the air-defence threat. Post-strike imagery eventually showed that the bomb stick had missed the runway itself.
The bombs still damaged the airfield area and produced craters near the western end, complicating possible runway extension. Stanley nevertheless remained operational for transport traffic.
The second raid is important because it highlights a basic truth of unguided bombing: the spectacular effort required to place a Vulcan over the target did not guarantee precision once it arrived.
Black Buck 3: Martel plans that never became an attack
The RAF explored adapting Vulcans to carry the Anglo-French AS.37 Martel anti-radiation missile. Black Buck 3 was planned around radar suppression, but the Martel option was cancelled before an operational strike.
The effort still matters because it shows how quickly the mission was evolving. Black Buck was no longer just about a runway. Argentine radar had become part of the wider struggle to suppress air defence around Stanley and protect naval and air operations.
The American connection: AGM-45 Shrike
Attention shifted to the American AGM-45 Shrike anti-radiation missile. The weapon homed on radar emissions. American assistance was important in getting the unfamiliar missile onto the Vulcan quickly; specialist knowledge and equipment helped the RAF integrate a weapon the aircraft had never been designed to carry.

Black Buck 4: launched, then aborted
Black Buck 4 was intended as a radar-suppression mission. It launched on 28 May but was aborted/recalled after refuelling problems disrupted the plan.
This is an important corrective to the tendency to treat Black Buck as seven successful attacks. The operation name covered completed strikes, cancellations and aborts. Tanker availability and serviceability could stop a mission long before Argentine defences mattered.
Black Buck 5: 30–31 May
Squadron Leader Neil McDougall flew XM597 carrying Shrike missiles. Sea Harrier activity was coordinated to encourage Argentine radar operators to transmit and therefore expose themselves to an anti-radiation weapon.
Two Shrikes were fired. One exploded near the AN/TPS-43 radar position and caused damage around the site. The radar itself was not permanently destroyed and was returned to service, but British assessment suggested the attack encouraged more cautious radar use.
That is a different kind of effect from blowing up a radar. Suppression can be achieved if operators reduce transmission, relocate or change procedures because they fear being targeted whenever they switch on.
Black Buck 6: 3 June — radar attack and Rio
Black Buck 6 again sent XM597 against radar targets. Intelligence on the exact location of the Argentine radar sites was imperfect, and weather prevented the planned Harrier decoy activity.
Shrikes were launched, but the tactical result around Stanley was limited. The mission became famous for what happened afterwards.
During the return flight XM597's refuelling probe was damaged. Unable to take the fuel needed for the planned return to Ascension, McDougall had to divert to Brazil. Sensitive material was disposed of before entry into Brazilian airspace. Brazilian F-5E fighters intercepted the Vulcan and escorted it to Rio de Janeiro, where the aircraft landed at Galeão.
The episode exposed one of Black Buck's fundamental risks: the mission depended not only on reaching the target but on every critical refuelling event on the way home.
Black Buck 7: 12 June
The final Black Buck raid returned to conventional bombing of Stanley airfield. Martin Withers again flew XM607. By this stage British ground forces were closing on Stanley and the tactical situation was approaching its conclusion.
Twenty-one 1,000lb bombs were released. The raid caused further damage but did not transform the ground campaign. Two days later the Argentine garrison surrendered.
The raids in one table
| Mission | Date | Primary purpose | Outcome |
|---|---|---|---|
| Black Buck 1 | 30 Apr–1 May | Bomb Stanley runway | XM607 completed mission; one runway crater plus wider airfield damage. |
| Black Buck 2 | 3–4 May | Bomb Stanley runway | Completed; runway itself missed, damage around airfield and western extension area. |
| Black Buck 3 | 13–16 May planning window | Radar suppression with Martel | Cancelled; Martel option abandoned. |
| Black Buck 4 | 28–29 May | Radar suppression | Launched but aborted/recalled after refuelling problems. |
| Black Buck 5 | 30–31 May | Shrike attack on radar | Completed; near-hit/damage at radar site, encouraged more cautious radar use. |
| Black Buck 6 | 3 June | Shrike attack on radar | Completed; limited target effect; XM597 forced to divert to Rio after refuelling-probe damage. |
| Black Buck 7 | 12 June | Bomb Stanley airfield | Completed; further airfield damage shortly before Argentine surrender. |
Did Black Buck keep Argentine fast jets off the islands?
This is one of the most repeated claims and one of the easiest to oversimplify.
Stanley's runway was short and its facilities limited. Argentine Daggers, Mirage IIIs, Skyhawks and Super Étendards operated primarily from mainland bases for reasons that existed before the first Vulcan arrived. The runway crater and repeated threat of attack made basing high-performance jets at Stanley still less attractive, and concern over British long-range reach contributed to mainland air-defence decisions.
But it is too strong to say one Vulcan bomb alone forced every Argentine fast jet to remain on the mainland. The evidence supports a contributory effect, not a single-cause explanation.
Did Black Buck cause Mirage IIIs to defend the mainland?
British sources judged that the demonstrated ability to strike from Ascension contributed to Argentina retaining Mirage III aircraft for homeland defence. Freedman's official history accepts that this was probably part of the decision.
There were other reasons. The Mirage III had also proved vulnerable in combat against Sea Harriers on 1 May, and Argentina still had to protect critical mainland bases and cities. The responsible conclusion is therefore that Black Buck increased the perceived mainland threat and helped shape defensive allocation, rather than acting as the sole cause.
The RAF–Royal Navy argument
The post-war argument often becomes tribal: the RAF says Black Buck mattered; the Royal Navy says Sea Harriers could do the job more efficiently.
The reality is more useful. The two capabilities solved different problems.
Sea Harriers could repeatedly attack Stanley from the carriers, but every strike aircraft diverted from fleet air defence carried an opportunity cost. Vulcans could deliver a heavier bomb load from Ascension, but required an extraordinary tanker effort for each sortie.
Freedman's official history notes that Black Buck reduced some of the demand on Sea Harriers while also describing the Vulcan method as expensive and cumbersome. That is closer to the evidence than choosing a service winner.
Read the Sea Harrier Falklands Field Note →
The Victor achievement
If Black Buck is judged only by bomb damage, the tanker force disappears from the story. That is a mistake.
The Victors made the entire concept possible. They refuelled each other, refuelled Vulcans, supported Nimrod patrols, helped ferry Harrier reinforcements and sustained other long-range RAF activity. Tanker allocation was therefore a theatre-level decision, not simply a Black Buck technical detail.
This also explains why later raids could be cancelled even when Vulcans and crews were available. A Victor committed to Black Buck was a Victor unavailable for another task.
Technology improvised at speed
Black Buck is a catalogue of rapid adaptation:
- Vulcan crews returned to conventional bombing after years focused elsewhere.
- Air-to-air refuelling skills were restored under extreme time pressure.
- Electronic countermeasure equipment was adapted for Argentine radar threats.
- American Shrike missiles were integrated onto an aircraft never designed to carry them.
- Mission planning combined analogue navigation, old systems, improvised engineering and limited intelligence.
The popular image is of one huge delta-wing bomber. The operational reality was hundreds of people rebuilding a capability around it.
The Argentine view
Argentine defenders did not experience Black Buck as an abstract argument over cost-effectiveness. Bombs landed around Stanley, radar crews faced anti-radiation missiles, and the possibility of further attacks influenced behaviour.
At the same time, Argentine engineers repeatedly repaired runway damage and maintained transport access. Radar units relocated and adjusted operating procedures rather than simply disappearing. The defence adapted too.
That matters because military effect is interactive. An attack can fail to destroy a system yet still force the enemy to spend effort protecting, moving or repairing it.
Myth, anti-myth and the actual planning aim
Recent work using contemporary files helps cut through one of the longest-running Black Buck arguments. David Jordan notes that the raids have often been caricatured either as RAF self-promotion or as a miracle weapon. The archival picture is less tribal. Senior Royal Navy officers were among the strongest early advocates of using the Vulcan, while the Chief of the Air Staff was initially sceptical about the bomber's accuracy and the risk of bombs falling outside the airfield.
The key planning word was not close but impede. The Chiefs of Staff did not expect one Vulcan to shut Stanley for the duration of the campaign. Their concern was that the airfield constrained naval and amphibious operations and could support Argentine supply or more ambitious combat flying. That makes the proper test of Black Buck different from asking whether every transport flight stopped.
Jordan's reading of the contemporary record also adds an important logistics point: the Black Buck 1 crater, although temporarily repaired, reduced the margin available to heavier transport operations. With Argentine sea resupply largely removed after the loss of General Belgrano, even a runway that remained usable could still be operationally degraded without being closed.
The result is a useful correction in both directions. Black Buck was neither a single-service vanity project nor a campaign-winning runway kill. It was a joint attempt to complicate a real operational problem, and its effects need to be measured against that narrower aim.
So: was Black Buck worth it?
There is no single honest metric.
If the question is "Did Black Buck destroy Stanley airfield?", the answer is no.
If the question is "Did the raids prevent all Argentine flying from Stanley?", the answer is no. Transport aircraft continued to use the runway.
If the question is "Did Black Buck prove Britain could project RAF strike power from Ascension, crater the runway, complicate fast-jet basing, suppress radar behaviour and influence Argentine mainland defence calculations?", the evidence supports a qualified yes.
If the question is "Was that effect cheap?", absolutely not. The raids consumed enormous tanker effort and placed old aircraft and crews into a mission at the extreme edge of available capability.
That tension is exactly why Black Buck remains worth studying.
The Iron Standard conclusion
Black Buck should not be reduced to either legend: neither "one bomb won the air war" nor "the whole operation achieved nothing."
The first version ignores Stanley's continued transport operations and the contribution of Sea Harriers, naval gunfire, submarines, blockade and the land campaign. The second ignores the runway crater, the radar-suppression effects, the mainland-defence implications and the operational flexibility created by having a land-based strike option.
The strongest part of Black Buck was not the bomb damage. It was the system the RAF assembled in weeks: planners, engineers, Vulcan crews, Victor crews, Ascension, American assistance, electronic warfare and a refuelling chain that had almost no margin for error.
Wear the history
Black Buck 1982 T-Shirt — Falklands Vulcan Raid →
Related Falklands Field Notes
- Falklands War 1982 — Complete Campaign Field Guide
- Sea Harrier in the Falklands 1982
- San Carlos 21 May 1982
- Falklands 1982 — Terrain, Routes & Logistics
Sources & further reading
- David Jordan, “Corporate Lessons? Reflections on Some of the Myths, Anti-Myths and Omissions of Britain’s Falklands Air War, 1982”, Air and Space Power Review, Vol. 24 No. 1. Used for the recent archival reassessment of Black Buck's purpose, joint origins and operational effect.
- Rowland White, Vulcan 607. Used particularly for Black Buck 1, crew experience, the Victor refuelling plan and the rapid reconstruction of Vulcan capability.
- Andrew D. Bird, Operation Black Buck 1982: The Vulcans' Extraordinary Falklands War Raids (Osprey, 2023). Principal mission-by-mission reference for all Black Buck operations, Argentine defences, Shrike integration and aftermath.
- Sir Lawrence Freedman, The Official History of the Falklands Campaign, Volume II: War and Diplomacy (Routledge, 2005). Used for official strategic context, airfield effects, Argentine response and the wider assessment of air power.
- Tony Blackman and Anthony Wright, Valiant Boys. Used only for the historical development of RAF V-bomber air-to-air refuelling; not as a Black Buck mission source.
- Gallus — Falklands War 1982: Political Road to War.
FROM THIS CAMPAIGN
Falklands War
CONTINUE THE STORY
More from this campaign
Read it, reference it or wear it — the related pieces are kept together here.
FEATURED DESIGN
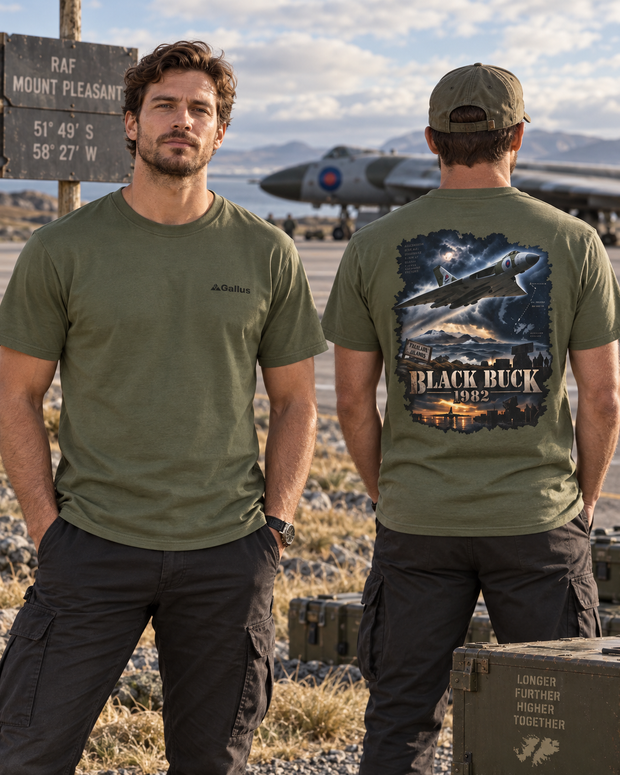
Black Buck 1982 T-Shirt — Falklands Vulcan Raid
€29,95 EUR
View the design →CAMPAIGN COLLECTION
Falklands War
Stay with this subject instead of being dropped back into the full catalogue.
Explore the collection →FIELD NOTES
Get new Field Notes by email
New research, campaign guides and useful references without a daily sales barrage.
