


Rorke’s Drift Battlefield: Map, Location, 1879 Layout & What to See Today
Rorke’s Drift Battlefield is in present-day KwaZulu-Natal, South Africa, beside the Buffalo (Mzinyathi) River. In January 1879 the mission station stood on the Natal side of the river, close to the crossing used by the British centre column before it entered Zululand. The Battle of Rorke’s Drift was fought there on 22–23 January 1879.
If you want the complete battle rather than the battlefield location and ground, go straight to the Battle of Rorke’s Drift 1879 complete field guide.
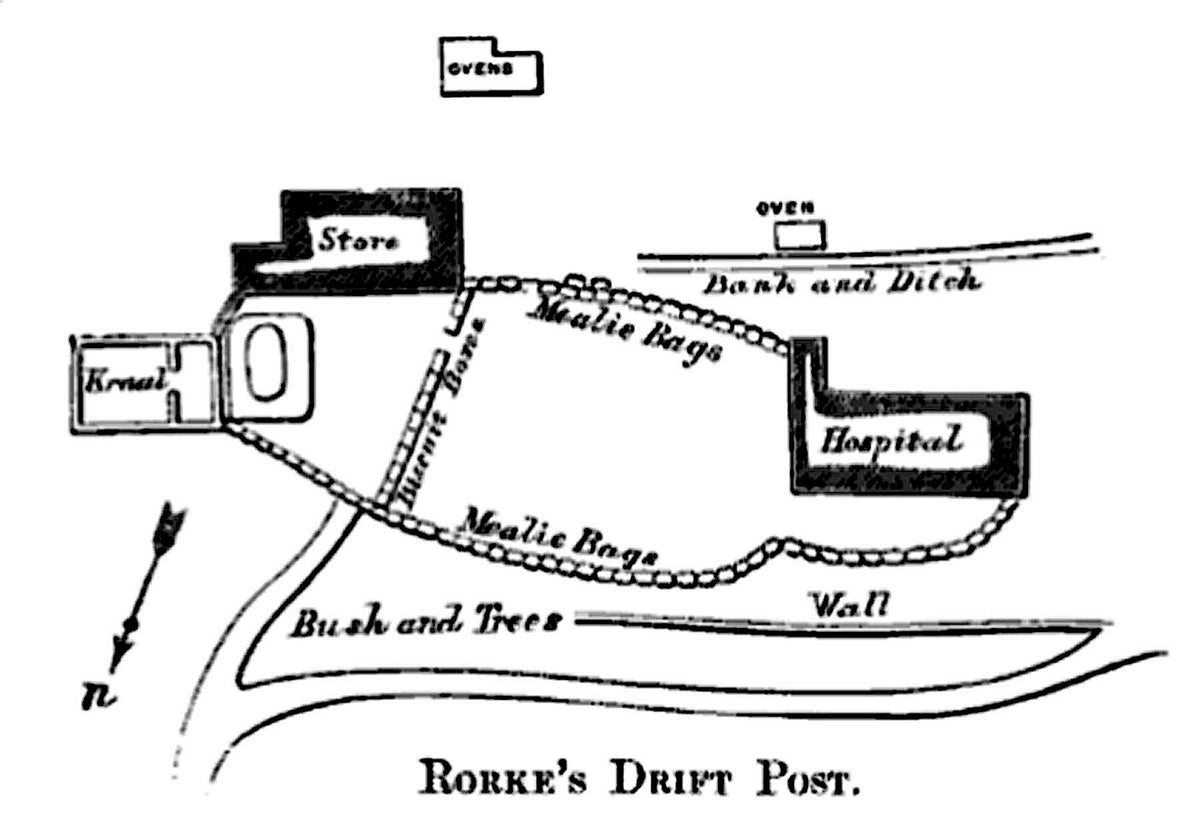
Rorke’s Drift Battlefield map

Where is Rorke’s Drift Battlefield?
The battlefield lies close to the Buffalo River in the modern Msinga area of KwaZulu-Natal. In 1879 the river marked the frontier between the British colony of Natal and the Zulu kingdom. That geography matters because the British centre column crossed at Rorke’s Drift before moving into Zululand and establishing its camp beneath Isandlwana.
After the British defeat at Isandlwana on 22 January, a Zulu force led by Prince Dabulamanzi kaMpande crossed toward the mission station and attacked the post later that afternoon.
Rorke’s Drift Battlefield today
The battlefield remains a recognised historic site. The KwaZulu-Natal Battlefields Route currently lists a museum/interpretation centre, café and toilets at Rorke’s Drift, with an entry fee payable. The site preserves the landscape and memorial setting around the former mission station, allowing the 1879 defensive layout to be read against the actual ground.
For anyone planning a visit, opening arrangements and access conditions can change, so current local information should be checked before travelling. Gallus uses the visitor information here only to explain what survives at the battlefield today; the historical reconstruction below remains the main purpose of this guide.
What does the battlefield map show?
The defensive position centred on two main buildings: the hospital and the storehouse. A cattle kraal stood nearby. The defenders used mealie bags, biscuit boxes and other available stores to connect those features into a temporary perimeter.
The map is useful because it shows why the battle cannot be understood simply as a line of infantry firing into an open field. The perimeter changed as the fighting developed. When parts of the original position became too difficult to hold, the defenders shortened the line and concentrated around the storehouse and an inner redoubt.
How the ground shaped the battle
Rorke’s Drift was not a purpose-built fort. The advantage came from turning a relatively compact group of buildings and stores into a defensible system before the attacking force arrived.
- Compact frontage: the defenders could shorten their perimeter as pressure increased.
- Buildings: the hospital and storehouse gave structure to the defence, although the hospital later became a close-quarter fight and was set alight.
- Supply: ammunition and stores were physically close to the firing line.
- Fallback positions: the mealie-bag redoubt and contracted inner line reduced the area that had to be held.
- River crossing: the post sat beside a strategically important crossing between Natal and Zululand.
Which direction did the Zulu attack come from?
Dabulamanzi’s force came from the Zululand side, crossed the Buffalo River and approached the post broadly from the south and south-east. As the battle developed, attacks pressed different faces of the perimeter rather than remaining one simple frontal assault.
For the full attack sequence, company-level context and chronology, use the complete battle guide.
How many men defended Rorke’s Drift?
Historical rolls vary depending on who is counted as present and who remained through the principal action. A useful short answer is roughly 150 men at the post, with the effective fighting strength smaller than the headline total.
Gallus keeps the uncertainty visible rather than forcing one disputed number. See the unit-by-unit list of soldiers and defenders at Rorke’s Drift.
The eleven Victoria Crosses
Eleven Victoria Crosses were awarded for the defence. The recipients included John Chard, Gonville Bromhead, James Langley Dalton and eight others whose individual biographies are linked in the archive.
See all 11 Rorke’s Drift Victoria Cross recipients →
Continue the Rorke’s Drift archive
- Battle of Rorke’s Drift 1879 — complete field guide
- List of soldiers and defenders at Rorke’s Drift
- The 11 Victoria Cross recipients
- Battle of Isandlwana — companion field guide
- Anglo-Zulu War 1879 research hub
