


Battle of Loos 1915: Gas, Kitchener’s Army & the Failed Breakthrough — Complete Field Guide
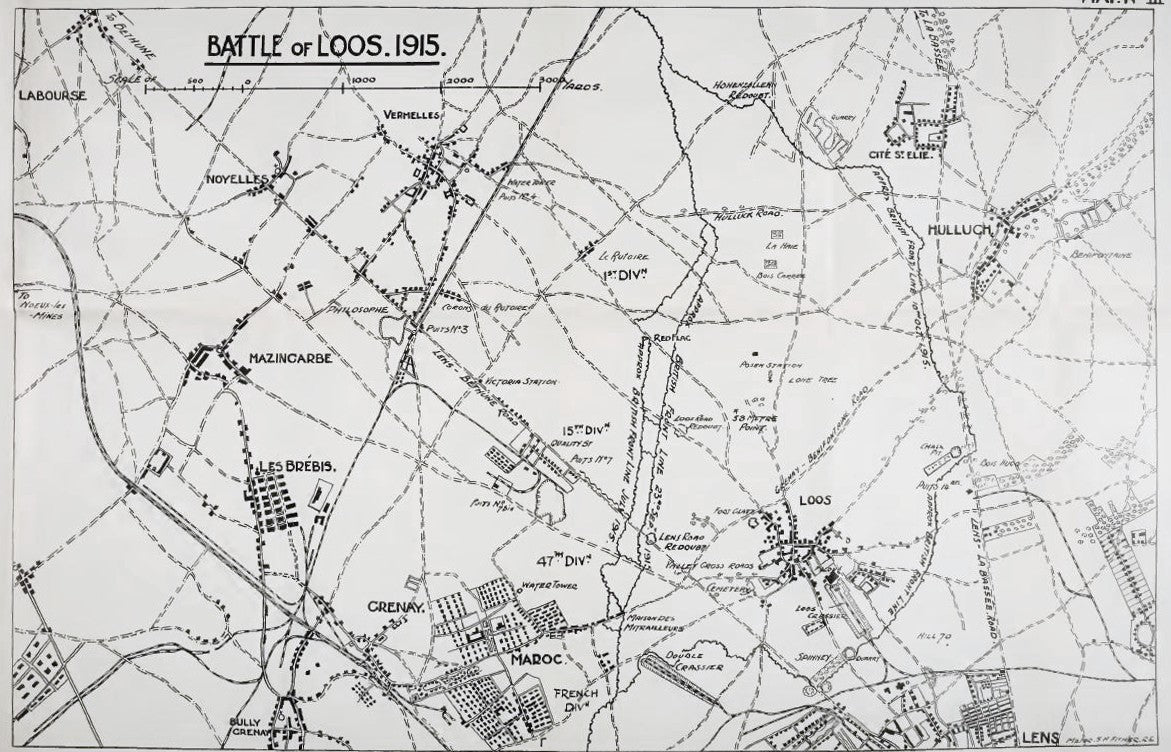
Loos was the British Army's largest offensive of 1915, the first major test of Kitchener's New Army on the Western Front and the first time British troops used poison gas on a large scale.
The battle opened on 25 September 1915 as part of a wider Allied offensive in Artois and Champagne. British troops broke into parts of the German position, but the advance outran support and reserves arrived too late to exploit the opening.
For the wider war, see First World War: Western Front Campaign Guide.
The ground
The Loos battlefield mixed mining villages, slag heaps, collieries and open ground. Industrial landmarks such as the Loos towers and the Hohenzollern Redoubt became tactical reference points. German wire, trenches and machine-gun positions dominated likely approaches.
Why the British attacked
The offensive supported French attacks farther south. British commanders had concerns about the ground and available artillery, but coalition strategy required pressure along the front.
Chlorine gas
The British released chlorine from cylinders before the infantry assault. Wind conditions were unreliable. In some sectors the cloud drifted effectively toward German positions; elsewhere it lingered or blew back, causing British casualties and confusion.
Explore this history
Continue from this Field Note into the closest Gallus campaign and military-history collection.
The first day
Despite heavy losses, troops captured Loos village and penetrated the German front around Hulluch. The problem was exploitation. Communications broke down, units became disorganised and reserves were too far back to turn local success into a deeper breakthrough.
New Army under fire
Loos was a major first battle for formations raised after 1914. Volunteer battalions entered a battlefield that punished inexperience but also showed that the rapidly expanded Army could attack entrenched positions when artillery and local conditions aligned.
Command and reserves
The handling of reserves became central to later criticism of the battle. Sir John French and Douglas Haig disagreed over responsibility for delays. The failure contributed to French's replacement as commander of the BEF later in 1915.
Cost
British casualties exceeded 50,000. The battle showed that breaking into a trench system was only the first step; artillery, reserves, roads, communications and staff control had to move forward fast enough to exploit success.
Myths and evidence
“Gas caused the battle to fail.”
Gas problems mattered, but the larger failure involved artillery limits, communications and delayed exploitation.
“Nothing was achieved.”
Ground was taken and important lessons were learned, but no strategic breakthrough followed.
Continue exploring
Sources and evidence used
- National Army Museum — Battle of Loos.
- British official history and unit war diaries for September–October 1915.
Related Field Notes
FROM THIS CAMPAIGN
World War 1



CONTINUE THE STORY
More from this campaign
Read it, reference it or wear it — the related pieces are kept together here.
CAMPAIGN COLLECTION
World War 1
Stay with this subject instead of being dropped back into the full catalogue.
Explore the collection →FIELD NOTES
Get new Field Notes by email
New research, campaign guides and useful references without a daily sales barrage.
